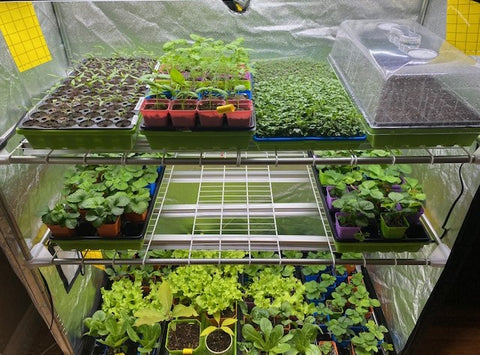
Setting up an indoor garden is a great way to start growing microgreens, leafy greens and herbs year round, and for starting seedlings indoors that you plan to move to your outdoor garden. They can take up minimal space by utilizing racks with shelving for growing smaller plants, and with the current cost of leafy greens, fresh herbs and microgreens, your grow rack could pay for itself in a very short amount of time! Let's have a look at the different options for creating a simple indoor garden, I have used my families grow tent with shelves as an example, so you can see exactly what's needed to set one up.
Step 1 - Pick your Shelving or a Grow Tent
For a simple, adaptable, indoor garden, 48" wide by 24" deep wire racks work great and are available at many hardware stores. The wire shelves allow light from overhead to pass through if available, and make it easy to mount your grow lights. When growing smaller plants, multiple shelf racks save a lot of space over a traditional grow tent that is completely open. A propagation tent like the Secret Jardin Dark Propagator that comes with shelves is the best of both worlds, it has multiple, adjustable levels to save space, and the grow tent can be closed for climate control if needed. My favorite part about having a grow tent with shelves is it keeps the area clean from spills, sprays and dirt. If you want to grow full size plants, a traditional grow tent and lighting would be required, but this guide is for anyone looking to grow microgreens, seedlings, leafy greens and herbs at home.
Step 2 - Add Grow Lights

Sunblaster
T5HO fluorescent or
LED Strip Lighting work perfect for multiple shelf racks. They come with daisy chain cables for consolidating the power cables for up to 8 fixtures.
Longer daisy chain cables can be ordered for connecting lights between shelves. (The default daisy chain cables are only 12" long and may not reach between shelves). They also come with hanging clips that can be easily secured to the wire rack with wire or zip ties for easy installation. If you plant to raise and lower your lights as your plants grow, Sunblaster
hangers and
rope ratchets would be required.
For a 48" long shelf, a
48" long light strip should be used, as very little light is projected outside the ends of the light strip. Each light strip is generally able to cover up to a 10-12" wide area, so at least two lights are required for 24" wide shelves. Extra lights can added for growing larger greens and starting seeds to avoid stretched (leggy) seedlings, or if you don't want to have to raise and lower your lights.
Personally, I use three light fixtures per shelf so I don't need to raise and lower the lights to provide optimal light for my seedlings and leafy greens. One shelf only has two light fixtures, which works great for low to medium light plants and seedlings as well as growing microgreens, which have a lower light requirement.
Don't forget to pickup a
timer with your grow lights, as we recommend running your lights for 18 hours a day, with a 24 hours dark period. If you notice your plants are stretching more then you would like, you can try keeping your lights on for 24 hours to provide some extra light to them.
Step 3 - Add a circulation fan or two
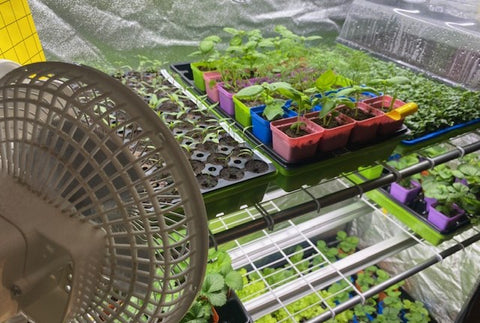
Circulation fans create airflow over your plants, and the simulated wind will help your seedlings develop strong stalks and result in crunchier leaves on your leafy greens. We have some clip fans that will attached to the wire rack poles, but any fan that creates a breeze for your plants will work. We don't want so much airflow it blows the plants over and causes damage or wind burn, we want to simulate a nice breeze.
Step 4 - Stock it with pots, trays, domes and inserts

For the plastics I use in our indoor garden, I can break the options down based on the type of growing.
Microgreens
For Microgreens, shallow trays with and without holes work best. We love the Bootstrap Farmer
1010 and 1020 size Microgreen trays. The reason we use a tray with holes and a tray without holes is for bottom watering. Microgreens should always be watered from the bottom to prevent mold and to evenly water your
growing medium. Microgreens grow so densely that watering them from above traps moisture in the leaves of your plants. Using a shallow tray make it much easier to harvest your microgreens and save on
growing medium over a deep tray, but are not required.
You can add a weighted down second tray without holes to place over your microgreens seeds to keep them moist and help develop stronger stalks as they root and push up on the tray. A
blackout dome will allow you to have your microgreens stretch initially as they start to grow, and when the dome is removed they will develop color quickly and be ready to harvest within a couple days. See our
Microgreen guide for more information on growing Microgreens!
Seed Starting

We also like
propagation domes with air vents to keep the seedlings moist during propagation. Once the seeds have sprouted, you can open the vents to allow a small amount of airflow, and a day or two later the dome should be removed completely to prevent mold and excess moisture and so your
circulation fans can help your plants develop strong stalks. A lot of people don't like propagation domes, but I typically find they had a bad experience leaving them on too long. They are great for keeping your seedlings moist, especially for seeds that take a week or two to germinate like
peppers, but they are not required.
Once my seedlings have their true leaves and some roots are visible through the bottom of the insert tray or coming out the bottom of the
Jiffy/Grodan plug, they could be moved into the outdoor garden. With larger plants and depending on the time of year I will move them up into a larger
plastic nursery pot or
fabric pot for additional time indoors to develop. Any pot under 4" wide is a good next step, and we love the
Bootstrap 2.5" Seed Starting Pots and
32 cell inserts for keeping things organized. If you move directly into a pot larger then 4 inches, be careful not to overwater the plants.
Leafy Greens and Herbs
Leafy Greens and Herbs can be grown year round on this type of growing rack because they require minimal light compared to most plants that produce a fruit or vegetable. They are usually started the same as any other seedling, but can move moved into a 6" or approx. 1 gallon pot for the rest of their lifecycle when grown indoors. A
1020 propagation tray should be able to hold 6-8 leafy greens at a time. The
Heavy Duty Bootstrap trays are great for bottom watering your lettuce and the
Bootstrap 5.0" pots are the perfect size for growing most leafy greens and herbs and they fit 8 pots neatly per 1020 propagation tray. Your leafy greens and herbs can be grown simply with soil or hydroponically. Their are dozens of methods available, too many options to review in this guide!
Step 5 - Additional products to complete your garden

Growing Medium
Growing in soil means I always have a couple bag of premium soil like the
Gaia Green Living Soil or
Black Swallow KIS Mix nearby. I also have a few bricks of
compressed coco coir for microgreens and seed starting (also a great base for many houseplants) on hand, these product can be mixed together to make a nice light soil for small plants and growing leafy greens.
Nutrients
Measuring Cups and Syringes
Measuring cups and syringes for measuring nutrients and watering your plants. They should have graduated measurements on them so you can make sure to apply the proper amount of fertilizer to the correct amount of water.
Seeds
Hygrometers
A
Hygrometer/Thermometer displays the humidity level of your grow area. Most plants are going to do best close to 50% humidity, and growing is easily manageable indoors between 40-60%. Outside of this range you may need some equipment like a grow tent, exhaust fans or humidifier to help manage your growing climate.
Sprayers
A
pump sprayer is great for soaking your microgreens after your spread them out over the growing medium. I also spray over top my insert trays and plugs when planting seeds to make sure the seeds are moist. You can also use them for
pest control if you have any issues with gnats, thrips, etc.
Sticky Strips
Yellow and blue sticky strips are great for attracting pests around your indoor garden and will let you know if you have a pest problem developing. While they likely can't completely protect your garden from pests, they are an excellent first line of defense and will let you know if you are having any issues with pests right away.
pH Meters and EC Meters
I don't use my
pH meter or an EC Meter when growing with a good quality soil, but for coco coir, pro-mix and other hydroponic growing they are required tools to make sure the nutrients you are providing your plants are in a useable state and to track how much nutrients your plants are using.
Rack Trays and Flood Trays
Another great way to keep things clean and organized is using
flood trays. Required you are setting up an automated watering or hydroponic system like Ebb and Flow for containing water. We have a wide variety of sizes of flood trays and stands available in our retail store.